Showing posts with label How-to. Show all posts

Tuesday, April 24, 2012

Wandering Gypsy Girl Broccoli Cheese Soup

Broccoli Cheese Soup
Ingredients
1 leek sliced
1/4 sweet yellow onion sliced
1 small potato sliced
1-2 heads fresh or frozen broccoli (florets separated from the larger stock-discard large stock or hold aside for making vegetable stock later)
chicken or vegetable stock (enough to cover veggies)
1 stick butter
2-3 tbl flour
cheddar cheese shredded - to taste (at least 2-3 handfuls)
milk or cream 
S&P to taste
 Rinse leeks to remove grit (slice at about 1/2 way up the dark green stem). Remove broccoli florets if using fresh broccoli and slice onion and peeled potato.
 Add 3-4 pads butter to pot and saute broccoli, leeks, onions, and potato until onions are translucent. Season with S&P here.
 Add enough stock to cover the veggies.
 Cover with lid and simmer until broccoli, potatoes and leeks are soft.
 Transfer all but 2-3 tbls of liquid to the blender and pulse until smooth.
 Add flour to stock remaining in the pot and make a rue. Add milk in slowly creating a base for a cheese sauce.
 Add desire amount of cheese (I like a lot!).
 Add veggie puree back into pot with cheese sauce - combine and bring back up to temp.
Serve warm with crusty bread.

Wednesday, March 14, 2012

Wandering Gypsy Girl Roasted Chicken

What you'll need.
Preheat the oven to 400
In a small bowl combine spice mixture, lemon rind and butter. Spices: cumin, paprika, marjoram, thyme (there should be mostly thyme), S&P. Make a thick paste - this will go between the skin and meat as well as over the top of the skin for flavor and moisture.
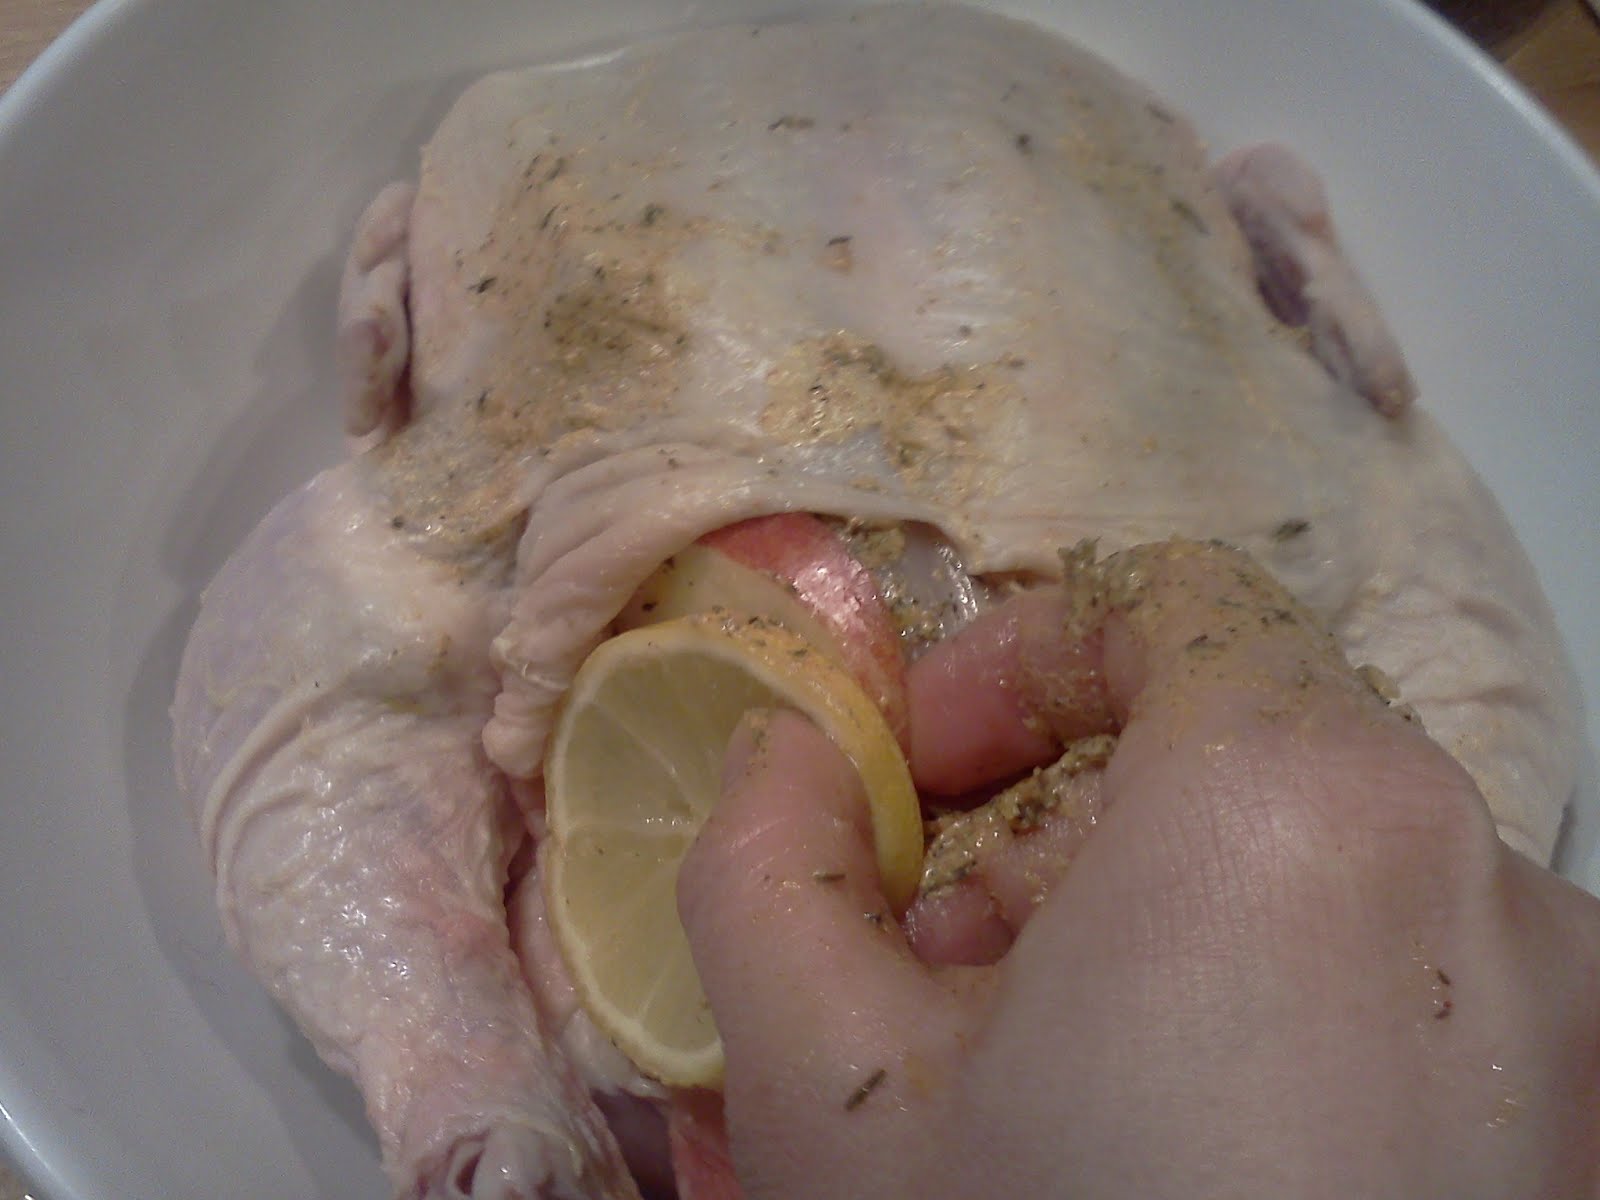
Gently lift skin away from meat with fingers. Rub butter mixture in as you go.
Place thinly sliced apples and lemons between the skin and meat (over the herb butter). Layer the apples closest to the skin - the acid from the lemons will help bring out the sugars in the apples to flavor the meat. Stuff the cavity with onion, oranges, lemon, apples, and garlic that have been seasoned with S&P.
In your roaster create a bed for your chicken to cook on (this prevents it from sticking to the bottom - you may also use a rack or insert...but using vegetables and fruit adds far more flavor for the meat and the gravy after).
Saute roughly chopped onion, celery, carrot, lemon, orange, and apples briefly.
Nestle the chicken into the warm vegetables and fruit and cover the chicken with bacon (the fat from the bacon will keep the bird moist without braising. By increasing the initial fat content and cutting out the step for braising you allow the oven door to stay closed through cooking thus allowing for a more even cooking temperature throughout the process.
Cook at 400 for 20min then reduce heat and continue to cook for 20min per pound or until the juices run clear. Remove bacon about 10-20min before you are ready to remove the chicken to allow the outer skin to brown.
Once the juices run clear remove the chicken from the oven. The skin over the fruit will be thin d/t the high acidity.
Remove the chicken from the pan into a bowl breast side down. Allow to rest.
By allowing the chicken to rest breast side down you are allowing the juices to redistribute into the breast meat keeping the bird very moist.
Break down the chicken by removing the breast meat in whole pieces.
Separate the legs, thighs, wings and accessory meat. Serve on a formal platter for parties or separate and store if you are using the meat for other meals/recipes such as some of the leftover makeovers listed previously on the blog.
If serving immediately serve along side a nice bright vegetable such as green beans and a flavorful starch.

Homemade chicken stock

Waste not ... Want not! In my childhood home my mother almost always had something on the stove simmering away. From tomatoes to chicken bones my mother could transform leftovers and extras into delectable freezable's that could be used again and again.

To make Chicken Stock
Remove the giblets, and neck bone (leave the skin on the neck bone/meat). Roughly chop celery, onion, carrots and garlic. (If you are deboning the chicken instead of cooking it whole you can add ALL of the bones to the stock pot. The bones add a great deal of flavor.)
Add all ingredients to a stock pot with 1-2 pads butter, thyme, a bay leaf, and S&P. Saute for 5-10 minutes over medium heat until onions are soft but not burnt. Cover with water, bring to a boil, reduce heat to a simmer and then cover with a lid. Simmer over very low heat for a few hours.
Once the stock is rich in color and flavor remove from heat and allow to cool.
Strain stock through a fine mesh screen or cheese cloth.
Discard the vegetables, giblets and bones. You now have a rich flavorful stock that can be used for cooking right away, can be stored in the fridge temporarily, or frozen or canned for longer storage periods.

Saturday, February 11, 2012

A Girls Best Friend

Carrie and I have found on more than one occasion that some of our best work (cleaning or cooking) is accomplished while we are on the phone with one anther. The kids are at school or have gone to bed (I may be up late because I have to work the next day) and laundry needs to be folded or the dishes need to be put away, or we need to make dinners or birthday cakes etc. BUT we've been working or cleaning or cooking or running after others all day and we are less than inspired.
Sometimes the best inspiration is a sister or best friend. Once on the phone we encourage one another to finish our tasks and at the same time entertain one another through the process with stories from the previous few days. Before we know it we're laughing and catching up and the laundry or dishes have practically done themselves.
Next time you find yourself staring down a pile of work and feeling less than inspired...grab your phone and get to gabbing! Before you know it the work will be done :-)

Weekly cooking

I've been working nights at the hospital for almost a year now and find that it can be very difficult to get myself motivated to cook when I work multiple shifts in a row. By the time I get home from a 12 hour shift I am less then inspired to a whole lot more than shower and sleep. Unfortunately not cooking can be very hard on the pocket book.
Taking a page from my mothers book (who is a very smart woman who successfully raised three very busy young girls on a budget) I spent the evening on a day off cooking and preparing for the days ahead.
I love cooking and so I took the time to pick out new recipes to try. However, If you aren't a huge fan of spending hours cooking -going with fast and easy go to meals works very well for this! By picking a single day to dedicate some time cooking...you can save yourself hours of time the rest of the week. You can prepare packed lunches as well as dinners for at home. If you want to make a more than will keep in the fridge for a few days...try a few freezable classics for the end of the week.

Tuesday, September 27, 2011

Holiday Table Displays

I know this isn't a recipe... but I thought with the holidays coming up it might also be fun to share our entertaining/decorating ideas with one another to help us get inspired to not only prepare an amazing culinary feast for family and friends...but also a feast for the eye's.
The cornicopia is filled with yarn in the back to hold the fall veggies upright for the display. The candle holder is an empty wine bottle (try local restaurants many are happy to pass along their empty bottles)
The flowers and grass in these displays were gathered from yard...but if you don't have these readily available check out the dollar store...for under 5 dollars you can have all these same pieces to decorate your table.
The ribbon is from the dollar store and the lantern is from Ikea (only 3.00)!

Happy Decorating!

Saturday, February 26, 2011

My New Favorite Secret Ingredient...

I have been in a food rut. We seem to make the same 10 dishes over and over again and I admit that I have kind of come to dread dinnertime, because nothing really sounds exciting. Then a miracle happened. I went to the grocery store. ALONE. As in I didn't let any of my 4 children join me.
I was amazed at the produce section. I am always in such a rush that I hurry in and grab my staples; lettuce, carrots, potatoes, tomatoes and onions. Then I zip through to the next aisle, because I don't want to be stuck in the store in case my kids decide to start misbehaving. I never really stopped to look at all the variety of stuff in there. Food shopping had become a chore to be rushed through. (But I digress...)
The point is that when I was able to go alone I decided that I would try one new thing that I had never tried before. There in the produce aisle I found it. It was beautiful and completely foreign to me. EGGPLANT. So I  bought it, having no idea how to cook it or what it tasted like. After a little bit of research I found out that it can be pureed and added to sauces. It is AMAZING! It is so easy to do that I have been secretly sneaking eggplant into common every day meals, and my kids are none the wiser. It makes spaghetti sauces richer and soups are thicker, and heartier.
I decided to share my secret with you... Here's my eggplant technique- sneak it in a few dishes and see how you like it.
PS Don't tell my kids- they still don't know what they're eating! :)

 1. Cut your eggplant in 1/2, drizzle with olive oil and lightly salt and pepper them.
 2.Place your eggplant flesh side down on a foil-lined baking sheet. Bake at 375 for 25- 35 minutes. Flesh may be darkened a little, and that's okay.
 3. This is what it looks like when you pull it out of the oven.


 4. Carefully lift you eggplant half  and scrape the contents out of the "shell" into a bowl. It should scrape right out without any difficulty.

 5. It will look like this. The little tiny seeds are completely edible and get pureed so don't worry about them.
 6. Use a hand mixer to puree eggplant.
7. When you are done, it will have the consistency and color of pureed bananas.

8. Your eggplant is now ready to sneak into your favorite sauce or soup.

Other than baking times, the whole process from start to finish takes me about 5 minutes to complete.


FOR YOUR INFO:
Eggplant is supposed to be really good for you and is a low calorie food! Go to
http://www.whfoods.com/genpage.php?tname=foodspice&dbid=22
for more information about the health benefits of eggplant.

Friday, January 21, 2011

How-to Debone a Chicken

How to debone a chicken (or really any foul) Julia Child style!
Okay Julia explains things very clearly in Mastering the Art of French Cooking...BUT I think she could use a little picture guide to assist home cooks. So...Julia this is for you :-)
First get out your copy of Mastering the Art of French Cooking, your sharpened boning knife, and a whole foul. (Rinse and thoroughly pat dry. If the bird is wet it will be slippery and can cause an injury when cutting).
Create a long incision along the back bone of the bird from the neck to the tail. Then working with your knife always toward the bone (to ensure you don't mangle the meat or pierce the skin), work down the rib cage of the bird to allow the first half of the bird to flap open and away from the cage. Use your fingers to help guide the meat away as you work down the rib cage. Once you get to the front breast bone STOP! Do not continue to cut through as this skin is very thin and you risk piercing it.
Repeat on the other side. (one side may take you longer than the other, that's okay! Turn the bird if needed in order to ensure you maintain control of both the bird and the knife). When you get to the breast bone again stop.
With both sides off the ribs, separate the ribs from the breast bone and set to the side. Next working from the tail toward the neck use your fingers to separate the meat from the breast cartilage. Once you have a clear visual of the thin skin begin to remove the breast bone and cartilage making sure to keep the knife facing the bone so as not to pierce the thin skin.
Remove and set aside.
Next turn the chicken upside down so the wings are close to you and remove the first joint and bone of the wings (remove bones back to the elbow). Once the bone has been removed, cut the wings off at the elbow leaving a small boneless arm attached to the bird (as shown below)
Notice the small arms remaining. Next working on the first ball joint of the legs use your knife to remove the tendons which attach the meat to the bones and joints.
Once the ball joint is entirely exposed (as shown above) and you can see the beginning of the bone shaft pull the bone out. (Now simply pulling the bone out is far more difficult than it sounds and can mangle the meat if you don't do it properly. So...here is a trick to remove the meat from the bone cleanly).
Wrap a piece of cotton butchers twine around the bone using the first half of a surgeons knot.
Tie a knot at the far end of the sting in order to create a handle
Grab the sting and pull the sting up and away cleanly removing the meat from the bone. When you get to the ball joint the sting will catch. This is okay! Twist and wrap the string away to remove the first section of tendons from the joint and then use your boning knife as you did with the first joint to remove the remaining tendons and skin. This process will turn the leg inside out. To finish the chicken simply turn its little legs back right side out.
The fully deboned chicken
The deboned chicken with the carcass pieces and innards set out. Use the bones and innards to create a flavorful stock to cook with later.

If you find yourself daunted by the task just remember... you can do it, take your time, and always wear your pearls in order to channel Julia for luck... and you'll do great!