
Showing posts with label Kid Stuff. Show all posts
Showing posts with label Kid Stuff. Show all posts
Thursday, January 10, 2013
Vanilla Snowmen
It is something to do with the kids when they want to be out building
a snowman and it is too cold or they are sick or, like here in Utah, when
the inversion makes the air quality awful.
Basically, you use vanilla ice cream for snow and add goodies to make the face and body.
I started with a light dusting of coconut for "snow" covered ground:
 Next, I made a plate of leftover Christmas candy:
 Then I scooped 2-3 balls of vanilla ice cream and let them build:


Basically, you use vanilla ice cream for snow and add goodies to make the face and body.
I started with a light dusting of coconut for "snow" covered ground:


Tuesday, April 3, 2012
Carrot Cake Pops and a Lollipop Garden

I decided on Carrot cake, since we were going with an Easter/Spring theme.
1 box cake made per directions on the box and cooled.
Take 1/2 of the cake and 1/2 container of Cream Cheese Frosting and mix together making a dough.
Roll into balls (or carrot shapes) and stick in the fridge 2 hours or the freezer 30 min. (Make them small... like donut hole small, or to your horror, your beautiful creation will slowly make its way down the stick and die a sad death. With the carrot shapes, you can get a way with more weight because it it distributed differently... still, there was much bellowing and perhaps a few off color words dierected at the demise of some of my best cake pops.)
Melt white chocolate pieces and add desired food coloring.
While chocolate is melting, prepare candy sticks or dowels. Candy sticks are a lot more pricy. (I used dowels 3/4 covered with floral tape and on the one pictured, I used floral wire covered with floral tape to make the stem of the carrot.)
Dip the tip of the stick into the chocolate and place the firm, cold dough onto the stick. Hopefully you will have more luck dipping your dough in the chocolate. Not only did I have to thin my chocolate out with milk a bit, but I spread it with a spatula, as the chocolate kept pulling the dough off of the stick for me.
Place in styrofoam or a candy stick holder, like the one I got at Walmart and I would suggest keeping them cool until use. As you can see, some turned out MUCH better than others. But the kids loved them and their faces were CLEAN!


I had seen the idea for a lollipop garden on Pinterest using Tootsie pops.
It looked so cute and all it was, was the candy stuck in a patch of grass. Cute and easy, right?
Well, not for me. i couldn't find Tootsie pops anywhere. So I used dum-dums. Well, dum-dums are significantly shorter and got lost in the grass. So I added a mini muffin liner and tied the bottom with emroidery floss, then placed them in the actual flower garden. Even the boys att he party liked picking these flowers. :)

Complete with egg hunt, gift bags, coloring printable crowns and
rounds of duck-duck goose, simon says, and a bubble machine, I only spent
$30 on the entire party.
Sunday, January 22, 2012
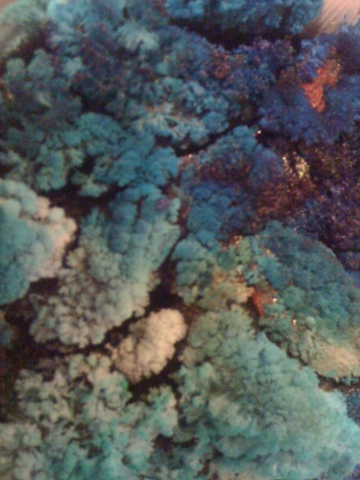
Coal crystal garden! ...not edible
This is a fun experiment to do with the kids and most of you will have the ingredients at home already!
Coal broken up into chunks, or charcoal
6 T Salt (NOT iodized)
6 T liquid bluing
6 T water
1 T Ammonia
Food coloring
Pie tin
Mix salt, bluing, water, and ammonia In a glass dish with a disposable utensil and after well blended drizzle over coal in the pie tin. Drop food coloring onto different chunks of coal and let sit. You should start to see results in a few hours. Left over night, it will look like this picture. It will continue to grow.
Thursday, November 17, 2011
Edible Turkeys!

We made these cute little turkeys for an activity at church tonight.
Thought you all might enjoy them! Follow the link for a list of ingredients...
Thought you all might enjoy them! Follow the link for a list of ingredients...
Thursday, July 7, 2011
Grandma T's Porcupines
1 Square butter
1 can Eagle Brand Milk
1 lb Carmels
Melt in Microwave, strring often
1 large box Marshmallows
1 box rice crispies
spread rice crispies accross a cookie sheet. Dip Marshmallows in caramel and use a large fork to roll the mallows in the krispies. Put on Waxed paper to dry.
You can also roll in chopped nuts and/or coconut
Friday, March 12, 2010
Bakerella's Cake Pops
Bakerella is famous for her cake pops and cake balls and really just about any baked good. She has some yummy and cute ideas. My family and I have fallen in love with her cake pops and balls. I prefer the pops only cuz it is less messy.


Last night I made strawberry cake pops, but I have made chocolate and red velvet. Red velvet is my absolute favorite cake flavor of all time. I liked it way before it became trendy. But I love that it is trendy, because now you can find red velvet cake mix by Duncan Hines in the grocery store. Also you can find cream cheese frosting in a can too! You can pretty much use any flavor of cake mix for these. Although, I don't think lemon, spice or carrot would be a good flavors with these...but I guess ya never know ;)
Here is the recipe:
Red Velvet Cake Balls
1 box red velvet cake mix (cook as directed on box for 13 X 9 cake)
1 can cream cheese frosting (16 oz.)
1 package chocolate bark (regular or white chocolate)
wax paper
To make them pops, you just insert paper sucker sticks after they have chilled. You can get those at any craft store, and sometimes the grocery store. Also the melting chocolate can be found at the craft store too. Usually in the same section as the sucker sticks. They have a rainbow of colors. I have only tried milk chocolate and white chocolate. But I think I'll make some for Easter and get some fun pastel colors :)
1. After cake is cooked and cooled completely, crumble into large bowl.
2. Mix thoroughly with 1 can cream cheese frosting. (It may be easier to use fingers to mix together, but be warned it will get messy.) I have found that you do not need the entire can of frosting. And each cake is different. Really moist cakes need less frosting and the dryer ones need more.
3. Roll mixture into quarter size balls and lay on cookie sheet. (Should make 45-50. You can get even more if you use a mini ice cream scooper, but I like to hand roll them.)
4. Chill for several hours. (You can speed this up by putting in the freezer.)
5. Melt chocolate in microwave per directions on package.
6. Roll balls in chocolate and lay on wax paper until firm. (Use a spoon to dip and roll in chocolate and then tap off extra.) If doing pops, then just insert the sucker stick and use that to dip and roll the cake balls in the chocolate. Also, you can stick them on wax paper to dry still, but if you want them to not have flat tops then you can stick them in a foam block thingy to cool and set.


Saturday, September 26, 2009
Go Italian!
Julie - Here is one of our favorites! We have it for both lunch and dinner.
Prep time 5 min
cook time 10 min
serve hot!!
Baggett or Hoagie (They have great day old specials on these)
Mozarella Cheese
1 tomato
(optional - pesto, make it or pick it up pr- made at the store)
To make your own pesto (combine all in the food processor or blender)
bunch basil
parmesan cheese
smashed garlic clove
pinch salt
dash red pepper flakes
lemon juice (1 lemon)
stream in olive oil until smooth
Slice bread in half, spread on pesto, layer slices of mozarella and slices of tomato. Place on cookie sheet and bake in oven until bread is crispy and cheese is melted. Cut into individual portions. Serve along side tomato cheese soup to make it a full meal.
Tuesday, March 31, 2009
Pasta Necklaces: Math patterning at home
*Rogatoni noodles
*1/4 C rubbing Alcohol
*food coloring
*Yarn
Put Pasta, alcohol, and desired amount of food coloring into a zip loc bag.
Close and shake.
When color is evenly distributed, empty contents onto a cookie sheet and let air dry.
use the yarn to make necklaces and encourage the youngin's to use patterns.
*1/4 C rubbing Alcohol
*food coloring
*Yarn
Put Pasta, alcohol, and desired amount of food coloring into a zip loc bag.
Close and shake.
When color is evenly distributed, empty contents onto a cookie sheet and let air dry.
use the yarn to make necklaces and encourage the youngin's to use patterns.
Subscribe to:
Posts (Atom)
